(or: Brouhaha’s Tips for Faking it When You Don’t Know How to Sew)
Have you gazed with envy, nay, hatred, upon those friends or acquaintances who whip up haute couture garments effortlessly and cheaply on their sewing machine, then tell you “oh, it’s easy”? Are you a knitter who is used to needles at least 3 mm thick and deathly afraid of those baby pointed things that can do real damage?
If so, fear not. You, too, can make beautiful couture garments with no sewing experience – and on the (super duper) cheap!
And you probably won’t break skin by stabbing yourself with a sewing needle… if you take it gently. Just read on.
“Tried and Not True” Tips will be inset for your convenience. (I initially thought of calling this “What Not To Do”. But of course, you’re free to do what you want. And maybe what didn’t work for me will work very well for you!)
EXPERIENCED SEAMSTERS PLEASE READ THIS: This blog post is in no way intended to minimise your great expertise and highly polished finished results. On the contrary. Please view it as an attempt by a sewing-challenged individual to attempt to reach step two on the ladder to your vaunted heights without shelling out for lessons or instructional materials.
My sewing example for today is my project entitled Fit to Be Tied.


1. Pick a theme for your piece
I’m not going to insult anyone here with the term “optional” (usually in parentheses). I have thrown far too many recipe books off the balcony because of this one seemingly inoffensive little word. Of course (for example) cayenne pepper in a chicken dish is “optional”. So is the chicken, and everything else down from there. When I grow up I’m going to write a million-selling cookbook called “If You Can Hold Your Finger In It For As Long As It Takes You To Count To 14 Without Your Finger Burning, It’s Time To Move On To The Next Step” (a time-honoured Greek cooking tip in the recipe for yogourt, guaranteed to ensure that no one else can actually replicate your award-winning recipe. (Um… guess I’d better work on that title).
However, if you just want something to wear and don’t feel like importing deep symbolism into it, use your best judgment. I’m certain it will be better than mine. End of side rant.
I came across the base materials for this at the Goodwill: 

My base theme became immediately apparent to me: anti-corporate law!!! (see my Lawsuitproject if you want more background on this theme).
The secondary theme (which quickly became the main theme) – straitjackets – came some time later. About halfway through the project I wondered if I hadn’t internalised The Tudors a bit too much. Then I thought that I was dwelling too much on work a bit too much. Finally it came to me: the piece was meant to represent:
(a) the tyranny of the corporate workplace;
(b) the fact that men wearing colourful ties tend to run the world, which constrains the rest of us.
Then I could sleep. 😉
2. Make Sure You Have All Your Materials:
The materials I used are the following:

– sewing needle (make sure it’s fairly sharp and small enough to let beads pass over, if you’re using them)
– 6/0 beads or seed beads – I used about 500 in this project
– buttons (vintage or otherwise)
You will also need:
– thread (I know, I know… but I started trying to do this project without thread!!!). I picked a fairly resilient type, in black. Any colour that doesn’t clash with the main colours of your piece will do.
– sharp scissors (fabric ones preferable – I know the sewing gods will frown upon me, but I just got a Singer pair at Loblaws for $8 that seems to do the trick).
– straight pins with the cute little colours at the end (available at most quality dollar stores or a fabric store)
You may also like to have handy:
– a seam ripper
– a thimble
– a dressform
(I did my work mostly on Aphrodite, my trusty dressform. It would help if you had one of those… if only to lay out your design. If not, I think you could improvise with a dress hanger and a shower rail).
2a. Find some appropriate music or television viewing to craft by.
While I made this piece, I listened to the following albums ad nauseam:

(Yes – ABBA. Don’t rag me about listening to ABBA. I am a big fan – and this album is my favourite. Bet you didn’t know that ABBA has dark music, either. If you don’t believe me, click this link. Bjorn and Benny must have been on the outs when this one was penned! I suspect these lyrics largely affected the more paranoid content of the vest, not to mention the straitjacket theme, actually.
And while we’re on the topic of musical preferences, let it be known that I was listening to so-called “lounge music” well before those who are too cool for school started to remix it and turn it into 21st century nightclub fodder. OK?!
Television viewing for crafting in the JB household tends toward:
– Dr. House reruns
– Law and Order reruns
– The Food Network
– British police procedurals and legal dramas (my current fave is Judge John Deed. Gotta love those wigs!!
– nature programmes (but only if JJ insists)
– science programmes (ditto re. JJ)
3. Decide how you want to put together your base materials.
I started designing the piece from the front and left the back for later (and in the process, completely changed my mind… more later).
Drape the neckties around your form (or hanger) until you see what you want to do. A criss-cross pattern worked for me:
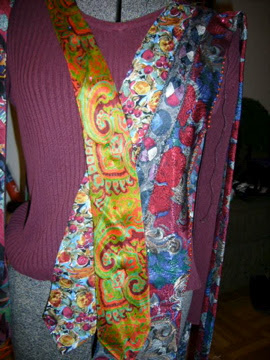 If it’s not evident from the photo, I used six neckties on the front (for a small). They were arranged in an alternating pattern of [fat end, skinny end]. If you can figure out how to make a top with all of the fat ends in the front, please do advise.
Do not worry if all or your neckties are not of identical width. It will all come out in the wash.
4. Pin the ties as you’d like to sew them, then sew them one by one.

Tried and Not True:I decided that it would be a really good idea to use my new favourite toy, the gluegun, to assemble this piece in full with no sewing. Mistake. It did seem like a good idea at least to adhere the neckties to the top with the gluegun and skip the pinning out. Until glue blobs like this started to happen:

Not only is it virtually impossible to sew through these (when the glue fails to adhere and your neckties start falling off), but you might end up with impossible to remove blobs that show!
(What does the government do when you call them in a panic complaining about errant glue blobs?
 They initiate a top level cover up! Quelle surprise!)
So – use the glue gun at your peril, and don’t say you weren’t warned!!
I used running stitch for the outside edges, and cross-stitch (from my vague recollection of needlepoint) to attach two ties together in the centre. This took a very long time… mostly because I only realised at the very last minute that I was doing the cross-stitch incorrectly. Any google search done with that word will probably yield you simple and accurate instructions for both).
This is an example of my rather lame running stitch:
 5. Apply beads if you’d like
I’m going to confess that the only reason I thought about using beads was that my stitching looks so atrocious that I figured no one would notice with sparkly beads. Did it work?
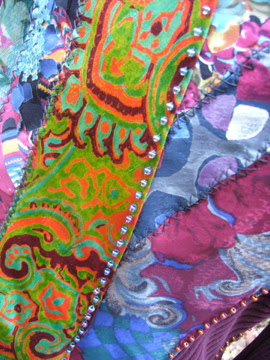 I should note that I only put beads where I had used the running stitch. The cross stitch also looked rather ridiculous, but I figured it had a Frankensteinish sort of appeal (you will note that I don’t offer a close-up view, however).
I did also put beads around the bottom of the top (that’s confusing, isn’t it? you know what I mean) and anouth the points of some of the neckties).
If you’re trying this at home, sew the front neckties up to the shoulder seam of the top you’re using, unless you have a better idea that involves less sewing (and please do advise me if so!).
6. Decide whether you can live with assymetry.
Why are neckties all different lengths, anyway? I must confess that my type-A side was not happy with the uneven edge left by the neckties at the front (and back). However, I was too lazy to figure out what to do about it. So, we’ll just call this a “design feature” . I gather assymmetrical hemlines are in these days, anyway. Good time for me to take up sewing!
7. Decide what you want to do with the back of your piece.
Initially, I had thought I would want to go with a criss-cross like at the front of the piece. But by the time I had finished that (try stabbing through layers of glue and neckties with a small needle if you think I’m impatient. I warped three of them!), I decided that wasn’t going to happen.
My first option was this peacock-like arrangement:
 Then JJ (who was patiently sitting by, as always – I’m very lucky that way) said “Why don’t you try this?”
 Good idea!!
I should note that JJs idea, however, also involved sewing all the ends down after they had been weaved together at the top. As you will imagine, I wasn’t into it. I slept on it (barely) and thought that the braiding would work well with what had by this point become the straitjacket theme:

Originally I thought it would be OK to leave the weaved/braided portion loose (and if this were only to be an art piece, I would have left it like that). However, I realised that this was probably not practical for wearing, especially when negotiating the ever-crowded and obnoxious transit system. So, I decided to affix the weaved portion together with little beads and side stitching with more beads:

There is one bead in the centre of each “weaved” portion.
I then braided the remaining pieces partway. The braids are affixed with buttons which I sewed on:

Part of the logic for this was that they would be easy enough to take off (provided they don’t fall off by themselves, given my execrable sewing skills) if I wanted to go the “peacock” route in future.
For this reason (as well as through general laziness), I decided not to affix the braids. They are hanging loose. I’ll let you know if this proves irritating when I wear the piece to work on Tuesday.
8. Give your sleeves some fancy cuffs!
I had decided partway through that I would use my two extra neckties to try to make some cuffs for the sleeves.
This allowed me the fascinating perpective of a dissected necktie (and from what I remember from grade 8, far preferable to frog dissection, and no formaldehyde! I get enough of that in my cigarette ration anyway…)
 Far more flimsy than I had thought! I guess I believed, given what I see on the news every night, that neckties are the 20th/21st century version of armour. Then again, maybe they are, given that everything these days is made out of plastic where it used to be made from metal….
But I digress. Here are the instructions:
(a) Cut a piece off the bottom of your necktie, about 3-4″ higher than the top of the point (see above).
(b) Sew the cut edges together with running stitch leaving about 1/2″ border, then trim rough edges.

Tried but Not True Tip: by this point I fancied myself to be quite the sewing genius. I also knew from all of my vast sewing experience that it is often advisable to turn things inside out. Hence: Check me out!! So brilliant… I stitched merrily away, and revealed my new creation, only to find this:
 Oops. This is what I told myself:
 I then did the correct thing, which was to stuff the sewed necktie cuff into the sleeve rightways up, pin it and sew it (of course I didn’t take a photo because I was so peeved with myself and just trying not to pitch the entire project off the balcony.) But here was the final result:
 Nice, eh? I added a vintage button as a mock cufflink as well.
9. Add whichever finishing details you desire (or whichever you need to cover up flaws, more frankly).
For example, I added these two buttons to cover up a fray in one of the ties:
 (It didn’t quite seem to work, but hey).
This, in my view, necessitated adding another button on the other side for balance: (I have no idea where the other button for this Zodiac pair is. It does display my sign, however (upside down in the photo – as JJ would say, nothing changes!) and so I was content.
I also decided to add beads along the seams (in the hope that it would even out some of the unevenness in sewing the ties to the front, as it happens – or at least, distract from it):

… and, every elegant piece deserves a lable:
(tiefed from one of the neckties – and part of the anti-corporate message):

I also put a lovely inside label which quite fits my interest in crafting:

And – that’s about it! (isn’t that enough!). All this to say that – even if you don’t sew, you too can have a lovely bespoke item in just nine steps (and with virtually no bloodshed):

Happy crafting! The tutorial is free – all I ask, if you actually use it, is that you drop me a line with a photo of the results (and whether I can publish them here or not – either is cool, of course).
Cheers,
Kristina


